5 First tutorial: the project server & preprocessor
In this tutorial, you’ll use Pollen to make a single HTML page with a poem. You’ll learn about:
The relationship of Pollen & Racket
DrRacket, the code editor
The project server
The preprocessor
If you want the shortest possible introduction to Pollen, try the Quick tour.
5.1 Prerequisites
I’m going to assume that you’ve already installed Racket and Pollen. If not, do that now.
I’m also going to assume you know the basics of using a command line to run programs and navigate your file system using commands like cd and ls.
5.2 Optional reading: the relationship of Racket & Pollen
As I mentioned in the The big picture, Pollen is built using Racket, and everything in Pollen ultimately becomes Racket code. If you’re comfortable with that idea, you may move along.
But if not, or if you’re just a curious character:
One of the key features of Racket as a programming language is that it provides tools to create other programming languages. These languages might look & behave like Racket. Or they might not. These languages might serve a general purpose, but more often they’re specialized for a particular purpose, in which case they’re known as domain-specific languages, or DSLs.
If you find this a strange idea, you’re not alone. Most programmers — and until recently, me too — have never made or used DSLs. If you have a programming problem to solve, you start with a general-purpose language like Python or Java or Ruby, and go from there. Nothing wrong with that.
But programming languages contain their own design choices and compromises. Sometimes the problem at hand is best solved by manipulating the language at a deeper level. When you make a DSL, you’re still programming in the underlying language, but doing so at a point of higher leverage.
Pollen is a DSL implemented in Racket. It is a close cousin of Scribble: The Racket Documentation Tool, another Racket DSL, which was designed for writing Racket documentation. The key feature of Scribble, and thus also of Pollen, is that it’s text-based. Meaning, whereas most languages have source files made of code with text embedded within, Pollen’s source files are text with code embedded within.
Moreover, Pollen is meant to be a small step away from Racket — you can think of it as a more convenient notation system for Racket code, similar to how Markdown is a more convenient notation for HTML. But unlike Markdown, which only lets you access a subset of HTML, anything that can be done in Racket can also be done in Pollen. (Also unlike Markdown, Pollen and Racket are full programming languages.)
As you work with Pollen, you’ll become familiar with how Pollen corresponds to Racket, and easily be able to convert commands from one notation to the other. In later tutorials, you’ll see how larger Pollen projects can be assembled out of a mix of Pollen and Racket source files.
But in smaller projects, like this one, you can just use Pollen.
5.3 Starting a new file in DrRacket
DrRacket is the IDE for the Racket programming language, and other languages made with Racket (like Pollen). IDE stands for “Integrated Development Environment,” which is a fancy phrase for “a nice place to edit and run your code.” DrRacket is installed as part of the core Racket distribution.
Experienced programmers may prefer to use a general-purpose text editor and the command line to edit and run Racket programs. That’s fine. But for these tutorials, I’ll assume you’re using DrRacket. Otherwise, I trust you to figure out what you need to do to keep up.
Launch DrRacket. Start a new file. The code in the file will look like this:
#lang racket
Within the main window, you should also see an interactions window, which shows the output of the current file, and starts out looking something like this (details, like the version number, will vary):
Welcome to DrRacket, version 9.2--2015-11-26(-/f) [3m]. |
Language: racket; memory limit: 1000 MB. |
> |
If you don’t see the interactions window, select View|Show Interactions from the menu.
5.3.1 Setting the #lang line
The first line of every Racket source file, and every Pollen source file, is called the #lang line. The #lang line identifies the language used to interpret the rest of the file.
For more about the #lang line, see Defining new #lang Languages. BTW, #lang is pronounced hash-lang.
When you start a new Pollen source file in DrRacket, you’ll need to change the #lang line to the Pollen language. The simplest way is to change the first line to this:
#lang pollen
Now run your file by clicking the Run button in the upper-right corner, or select Racket|Run from the menu. You’ll get something like:
Welcome to DrRacket, version 9.2--2015-11-26(-/f) [3m]. |
Language: pollen; memory limit: 1000 MB. |
> |
Notice that the language is now reported as pollen. If you like, change the #lang line to this:
#lang pollenxyz
Then click Run again. DrRacket will print an error:
Module Language: invalid module text
standard-module-name-resolver: collection not found ...
Why? Because there’s no language called pollenxyz. Switch it back to pollen and let’s move on.
5.3.2 Putting in the text of the poem
Here’s a short, bad poem I wrote about CSS.
The margin is 42em. |
The border is red. |
The padding is 15em. |
The border is too. |
Paste the text of this poem into your DrRacket editing window, below the #lang line, so it looks like this:
#lang pollen The margin is 42em. The border is red. The padding is 15em. The border is too.
Run the file again. In the interactions window, you’ll see:
The margin is 42em.
The border is red.
The padding is 15em.
The border is too.
This shows you something important: by default, any plain text in a Pollen source file is simply printed as written when you Run the file (minus the #lang line, which is just for Racket’s benefit). If you like, edit the text of the poem and click Run again. You’ll see the updated text printed in the interactions window.
5.3.3 Saving & naming your source file
Don’t skip this section! It explains an essential Pollen concept.
File naming in Pollen is consequential.
Ultimately, every Pollen source file in your project will be rendered into an output file. Each Pollen source file corresponds to one output file. The name of this output file will be the name of the source file minus the Pollen source extension. So a source file called "file.txt.pp" will become "file.txt"; "index.html.pp" will become "index.html".
Thus, to derive the name of a source file, we
Take the name we want for the output file and
Append the appropriate Pollen file extension.
Different Pollen source files use different extensions — but more about that later. For now, the extension you’ll use for your source is ".pp".
In this case, let’s say we want to end up with a file called "poem.html". Therefore, the name of our source file needs to be:
the output name "poem.html"
+ the source extension ".pp"
= "poem.html.pp"
In the rest of this tutorial, if you want to name the file "something-else.html.pp", be my guest. There’s no special meaning associated with the prefix of a source file. Only the suffix.
If your system or text editor gives you grief for having two file extensions, you can alternatively use an underscore character (_) for the inner extension. So instead of "poem.html.pp", your source file would be named "poem_html.pp". This filename will work exactly the same way, and still result in "poem.html" when rendered.
In a convenient location (e.g., your home directory or the desktop) create a new directory for your project called tutorial. In this new directory, save your DrRacket file as "poem.html.pp".
5.4 Using the project server
The project server is a web server built into Pollen. Just as DrRacket lets you run individual files and see if they work as you expect, the project server lets you preview and test your project through a web browser. While working on your Pollen project, you may find it convenient to have DrRacket open on half your screen, and on the other half, a web browser pointing at the project server.

“Why can’t I just open the HTML files directly in my browser?” If you want to keep making web pages the way we did in 1996, go ahead. But that approach has several shortcomings. First, when you open files directly in your browser, you’re accessing the local filesystem, and absolute URLs — the kind that start with a / — won’t work. Second, you have to render your HTML files in advance, whereas the project server is clever about doing this dynamically. Third, if you want to test your website on devices other than your own machine — sorry, you can’t.
So use the project server.
Even if you’re not planning to make web pages with Pollen, web browsers can display all common digital files, so the project server still ends up being a convenient previewing tool.
A note about security. The project server isn’t intended for real-world use, but rather as a development tool. That said, once you start the project server, it’s an actual web server running on your machine, and it will respond to requests from any computer. If you want to limit traffic to your local network, or certain machines on your local network, it’s your job — not mine — to configure your firewall or other network security measures accordingly.
5.4.1 Starting the project server with raco pollen
Before we start the project server, a word about the raco pollen command.
When you installed Racket, Racket installed a utility program called raco. This name is short for Racket command, and raco acts as a hub for — you guessed it — Racket commands. You used it when you first installed Pollen:
> raco pkg install pollen |
The first argument after raco is the subcommand. For instance, raco pkg ... lets you install, update, and remove packages like so:
> raco pkg update pollen |
> raco pkg remove pollen |
Likewise, raco pollen lets you issue commands relevant to Pollen. (See Using raco pollen for a full listing.) Here’s a simple one you can try:
> raco pollen version |
3.2.4604.793 |
Now we’ll start the project server with raco pollen. Go to your command line and enter the following:
> cd /path/to/tutorial |
> raco pollen start |
After a moment, you’ll see a startup message like this:
Welcome to Pollen 3.2.4604.793 (Racket 9.2) |
Project root is /path/to/tutorial/ |
Project server is http://localhost:8080 (Ctrl+C to exit) |
Project dashboard is http://localhost:8080/index.ptree |
Ready to rock |
Project root means the directory that the project server was started in, and which the server will regard as its root directory. Meaning, absolute URLs (i.e., those beginning with /) will resolve into this directory. So a URL like /styles.css will impliedly become /path/to/tutorial/styles.css.
If you use the bare command raco pollen start, the project server will start in the current directory. But if you want to start the project server elsewhere, you can add that directory as an argument like this:
> raco pollen start /some/other/path |
The next line of the startup message tells you that the web address of the project server is http://localhost:8080. This is the address you’ll put into your web browser to test your project. If you’re unfamiliar with this style of URL, localhost refers to your own machine, and 8080 is the network port where the project server will respond to browser requests.
If you want to run the project server on one machine and access it from a different machine (say, for testing purposes), you can’t use localhost. But you can use the IP address of the machine running the project server (e.g., http://192.168.1.10:8080) or any name for that machine available through local DNS (e.g., http://my-laptop:8080).
Though port 8080 is the default, you can start the project server on any port you like by adding it as an argument to raco pollen start:
> raco pollen start /path/to/tutorial |
> raco pollen start /path/to/tutorial 8088 |
> cd /path/to/tutorial |
> raco pollen start 8088 |
/path/to/tutorial/8088 is not a directory |
> raco pollen start . 8088 |
Welcome to Pollen 3.2.4604.793 (Racket 9.2) ... |
You can also change default port for the project server by overriding default-project-server-port, or parameterizing it with current-server-port. You can also run multiple project servers simultaneously — just start them on different ports so they don’t conflict with each other.
Your terminal window will report status and error messages from the project server as it runs. Use ctrl+C to stop the server.
5.4.2 The project dashboard
For each directory in your project, starting at the top, the project server displays a dashboard in your web browser. The dashboard gives you an overview of the files in the directory, and links to view them.
The address of the top-level dashboard is http://localhost:8080/index.ptree. Other dashboards follow the same pattern (e.g., http://localhost:8080/path/to/dir/index.ptree.)
The dashboard is deliberately not at http://localhost:8080/ or its equivalent, http://localhost:8080/index.html. Why? So it doesn’t interfere with any index.html that you may want to have in your project.
Thus, the dashboard relies on a different file, called "index.ptree". The ".ptree" extension is short for pagetree. In Pollen, a pagetree is a hierarchical list of pages. We’ll do more with pagetrees in a later tutorial. For now, just be aware that to create a list of files for the dashboard, the project server will first look for an actual "index.ptree" file in each directory. If it doesn’t find one, it will generate a pagetree from a listing of files in the directory.
Let’s look at the root-level dashboard for our project. First, make sure your project server is running:
> cd /path/to/tutorial |
> raco pollen start |
Then, in your web browser, visit http://localhost:8080/index.ptree.
You should see something like this:
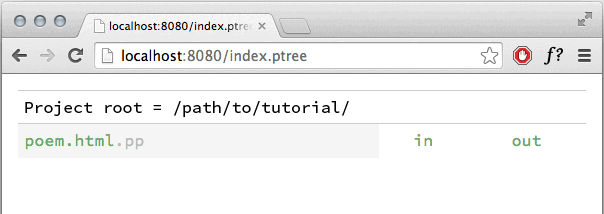
The top line tells us that we’re in the root directory of the project. We didn’t make an explicit "index.ptree" file, so the project server just shows us a directory listing.
5.4.3 Source files in the dashboard
We see the only file, "poem.html.pp". Note that the ".pp" extension is grayed out. The dashboard automatically consolidates references to source and output files into a single entry. What this entry says is “The directory contains a source file in ".pp" format for the output file "poem.html".”
Every source file on the dashboard has three links. The first link is attached to the filename itself, and takes you to a preview of the output file. If the output file doesn’t yet exist — as is the case here — it will be dynamically rendered when you click the link. (This is true whether you click its name in the dashboard, or link to it from another page.) So click the filename. You’ll see in your browser:
Granted, this is a boring web page. The main point here is that you’re seeing the output from your source file, which didn’t exist before. Notice that the address bar says http://localhost:8080/poem.html, not poem.html.pp. And if you look in your tutorial directory, you’ll see a new file called "poem.html".
In other words, when you clicked on the filename link in the dashboard, Pollen rendered the output file from your source file and saved it in your project directory. As promised earlier, the name of the output file ("poem.html") is the name of the source file ("poem.html.pp") minus the Pollen extension (".pp").
If you go back to the dashboard and click on the filename link again, you’ll see the same output file. If the source file hasn’t changed, Pollen will just show you the output file that’s already been rendered.
But if you like, open your "poem.html.pp" source file in DrRacket, edit the first two lines, and save the file:
Go back to the dashboard and click on the filename. This time, you’ll see:
Here, Pollen notices that the source file has changed, so it refreshes the output file. This makes it convenient to work between DrRacket and your web browser, editing source and then reloading to see the changes.
The other two links in the dashboard are labeled in and out.
The link labeled in will display the contents of the source file:
#lang pollen |
|
The cave is pitch black. |
Look out for the grue. |
The padding is 15em. |
The border is too. |
The link labeled out will display the contents of the output file (just like the “view source” option in your web browser):
The cave is pitch black. |
Look out for the grue. |
The padding is 15em. |
The border is too. |
For now, the files are identical except for the #lang line. But let’s change that.
5.5 Working with the preprocessor
Pollen can operate in several modes. One of these is preprocessor mode. A preprocessor is a tool for making systematic, automated changes to a file, often in contemplation of further processing (hence the pre-). You can use the Pollen preprocessor this way — as the first step in a processing pipeline.
Or you can just use it on its own, and leave your files in a finished state. That’s how we’ll use it now. We’ll build out our "poem.html.pp" source file so that when it exits the preprocessor, we’ll have a legit HTML file.
For more about the Pollen processing modes, see File.
5.5.1 Setting up a preprocessor source file
The file extension of a Pollen source file tells Pollen what kind of processing to apply to it. The ".pp" file extension stands for “Pollen preprocessor.” Here’s how you can use the preprocessor with any text-based file:
Insert #lang pollen as the first line.
Add the ".pp" file extension.
Run it through Pollen.
“I can use the preprocessor with any kind of text-based file?” Right. “But how?” The preprocessor reads the file, handles any Pollen commands it finds, and lets the rest of the content pass through untouched. To the preprocessor, it’s all just text data. It doesn’t care whether that text represents HTML, CSS, XML, LaTeX, or even TI-BASIC.
Let’s verify that our source file is ready for the preprocessor:
This file has #lang pollen as the first line, and ".pp" as the file extension. So yes — it meets the minimum requirements for the preprocessor.
5.5.2 Creating valid HTML output
Let’s update our source so it produces valid HTML. Edit the source as follows:
Return to the project server and view http://localhost:8080/poem.html. Earlier, the output looked like this:
But now, because of the <pre> tag, the poem will appear in a monospaced font, and the line breaks will be preserved:
The margin is 42em. |
The border is red. |
The padding is 15em. |
The border is too. |
As before, because the source has changed, Pollen refreshes the output file. From the dashboard, you can use the in and out links to inspect the source and output.
This is now a valid HTML page.
5.5.3 Adding Pollen commands
I mentioned that the preprocessor reads the file and handles any Pollen commands it finds. But our source file doesn’t have any yet.
Let’s add some. Pollen commands in your source file can be written one of two ways: Pollen style or Racket style. We’ll try Pollen-style commands in the next tutorial. For now, we’ll use Racket style.
To make a Racket-style command, just take any Racket command and put the lozenge character ◊ in front of it. For instance, these are valid Racket commands:
#lang racket (define inside 2) (define edge (* inside 4)) (define color "blue")
And these are the equivalent Racket-style commands in Pollen:
#lang pollen ◊(define inside 2) ◊(define edge (* inside 4)) ◊(define color "blue")
One caveat: because the preprocessor only deals with text, the Pollen commands you use in the preprocessor have to produce values that are either text, or can be sensibly converted to text. The preprocessor helps you out by automatically converting basic Racket values to text:
foo
C
1.4142135623730951
'(1 2 3 4 5)
'(1 1.4142135623730951 1.7320508075688772 2 2.23606797749979)
If you’re using more complicated data types, or you don’t like the preprocessor’s automatic conversion, you can convert your values to text by hand.
That said, Pollen won’t stop you from doing nonsensical things like this:
Pollen will try to fulfill your request, but weird things could happen. And the result definitely won’t be valid HTML, because you can’t simply drop binary data in the middle of an HTML file.
As Mr. Babbage warned — garbage in, garbage out.
5.5.4 Racket basics (if you’re not familiar)
“But I’ve never used Racket.” Today, you start. Here are the four basic rules of Racket:
The core building block of Racket is the expression. An expression can be a single value (like 2 or "blue"), a variable (like edge), a list of values (like (list 2 "blue" edge)), or a function call.
Function calls go between parentheses. Unlike most languages, the function name comes first, followed by its arguments (so it’s (* inside 4), not (inside * 4)). This is called prefix notation.
Every expression is evaluated to produce a value. A variable evaluates to whatever value it holds (so after we say (define inside 2), inside would evaluate to 2). A function call evaluates to its return value (so (+ 2 2) would evaluate to 4).
Expressions can contain recursively nested expressions. Thus, (* inside 4) could be written (* inside (+ 2 2)) or (* inside (+ (+ 1 1) (+ 1 1))).
Newcomers to Racket often gripe about prefix notation and parentheses. If you need to get it out of your system, go ahead. Keep in mind, however, that it’s not some peculiar affectation, but rather a necessary consequence of rule #1. In time, you’ll agree that the benefits outweigh the costs.
That’s all you need to figure out what’s going on in the Pollen commands below:
#lang pollen ◊(define inside 2) ◊; create a variable `inside` that holds the value 2 ◊(define edge (* inside 4)) ◊; create a variable `edge` that's four times the value of `inside` ◊(define color "blue") ◊; create a variable `color` that holds the value "blue"
To learn more about Racket syntax, consider a detour through the excellent Quick: An Introduction to Racket with Pictures.
5.5.5 Defining variables with Racket-style commands
Let’s use Racket-style commands to define variables that will hold some values for our page. First, add a <head> tag to your source file, and three commmands to define three variables:
Then look at http://localhost:8080/poem.html again. Does it look the same? Not a trick question — it should. If you click the Out link on the dashboard, you’ll see this:
<!DOCTYPE html> |
<html> |
<head> |
|
|
|
</head> |
<body> |
<pre> |
The margin is 42em. |
The border is red. |
The padding is 15em. |
The border is too. |
</pre> |
</body> |
</html> |
What’s with the blank lines? Don’t panic — a ◊(define ...) command creates a variable, but the command itself doesn’t evaluate to any value. So instead, we get blank lines. (Don’t panic about that either — define is an exception to the general rule that all expressions evaluate.) So far, so good.
5.5.6 Inserting values from variables
To insert the value of a variable in our file, we use the command ◊|variable-name|. Let’s do that now:
Here, we’re replacing three values in the poem with the variables containing those values — ◊|edge|, ◊|color|, and ◊|inside|. Reload the file in the project server, and you’ll see:
The margin is 8em. |
The border is blue. |
The padding is 2em. |
The border is too. |
Hey, look at that — the text of the poem changed. Now it even rhymes.
If you like, in the source file, edit the variable definitions with different values and reload the page in the project server. The page will be rendered afresh with the new values. In particular, if you update inside, you’ll also see edge change, since its value depends on inside.
Pro tip: when inserting a variable as a value, you can also just type ◊variable-name. The vertical bars on the sides are never wrong, but only mandatory when you want the value to appear flush against other text on the right.
5.5.7 Inserting variables within CSS
Our poem now makes claims about the margin, border, and padding of the page that aren’t yet true. To fix this, we’ll rely on the same basic technique of inserting variables into our HTML file. But instead of putting them in the <body> of the page, we’ll put them in a CSS <style> tag.
Update the <head> section of the page with a new <style> tag that defines a style for pre like so, using our variables for the relevant values:
#lang pollen <!DOCTYPE html> <html> <head> ◊(define inside 2) ◊(define edge (* inside 4)) ◊(define color "blue") <style type="text/css"> pre { margin: ◊|edge|em; border: ◊|inside|em solid ◊|color|; padding: ◊|inside|em; } </style> </head> <body> <pre> The margin is ◊|edge|em. The border is ◊|color|. The padding is ◊|inside|em. The border is too. </pre> </body> </html>
Notice that we’re using the same ◊|variable-name| pattern as before to insert the variable values.
What do we expect to see? We expect that the padding and border will be 2em wide, because inside is 2. We expect the margin to be 8em, because it’s equal to edge, which is inside multiplied by 4. And we expect the color of the border to be "blue", because that’s the value of the variable color.
And indeed, when you reload the file in the project server, you’ll see exactly that:
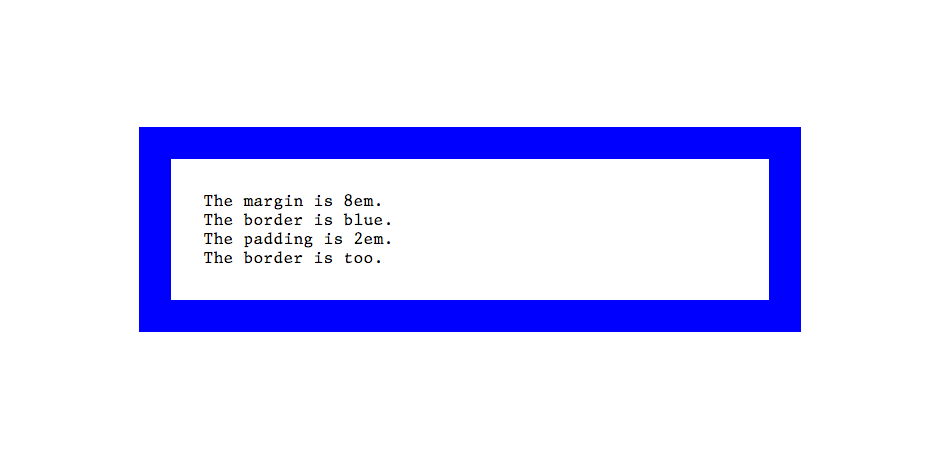
As before, if you edit the values of the variables in the source file and go back to the project server, you’ll see both the text and the layout change.
5.6 First tutorial complete
This was a sneaky tutorial. Though the HTML page we made was very simple, we saw all the key elements of the Pollen development environment, and learned about the preprocessor.
Feel free to go back and experiment with what you’ve learned. The next tutorial will assume that you’re comfortable with all the material here.