1 Overview
Drawing with draw requires a drawing context (DC), which is an instance of the DC interface. For example, the PDFDC class implements DC for drawing to a PDF file, while Bitmap.make_dc produces DC instance for drawing into a bitmap. When using the gui library for GUIs, the drawing callback for a canvas returns a DC instance for drawing into the canvas window.
1.1 Lines and Simple Shapes
To draw into a bitmap, first create the bitmap with Bitmap, and then call its Bitmap.make_dc method to get a drawing context:
> import draw
Use methods like DC.line on the DC to draw into the bitmap. For example, the sequence
> dc.rectangle([[0, 10], // top-left at (0, 10), 10 down from top-left
[30, 10]]) // 30 pixels wide and 10 pixels high
[30, 30]) // and draw to (30, 30), the bottom-right corner
> dc.line([0, 30], // start at (0, 30), the bottom-left corner
[30, 0]) // and draw to (30, 0), the top-right corner
draws an “X” on top of a smaller rectangle into the bitmap target. If you save the bitmap to a file with target.write("box.png", ~kind: #'png), then "box.png" contains the image
in PNG format. In DrRacket, simply printing the bitmap will show its content, so further examples will rely on that.
A line-drawing drawing operation like DC.line uses the DC’s current pen to draw the line, which can be accessed or changed as the DC.pen property. A pen has a color, line width, and style, where pen styles include #'solid, #'long_dash, and #'transparent. Enclosed-shape operations like DC.rectangle use both the current pen and the DC’s current brush, which is accessed or set as DC.brush. A brush has a color and style, where brush styles include #'solid, #'cross_hatch, and #'transparent.
For example, set the brush and pen before the drawing operations to draw a thick, red “X” on a green rectangle with a thin, blue border:
> dc.brush := draw.Brush(~color: "green") // #'solid is the default
> target
To draw a filled shape without an outline, set the pen to #'transparent mode (with any color and line width) or, equivalently, use Pen.none:
> target
1.2 Saving and Restoring State
A function that draws to a DC will usually need to change
DC.pen, DC.brush, or other properties of
the DC, and normally it should restore settings afterward. Use
DC.save to push the current state to a internal stack,
and use DC.restore to pop the stack and restore that
state—
dc.save_and_restore:
dc.ellipse([[25, 25], [100, 100]])
dc.rectangle([[50, 50], [10, 10]])
dc.rectangle([[90, 50], [10, 10]])
dc.brush := draw.Brush.none

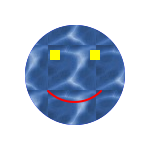
Incidentally, a brush doesn’t necessarily have just a solid color. If "water.png" has the image
then it can be loaded into a bitmap and used as the stipple for a brush:
> draw_face(dc)
> target
1.3 Transformations
Any coordinates or lengths supplied to drawing commands are transformed by a DC’s current transformation matrix. The transformation matrix can scale an image, draw it at an offset, or rotate all drawing. The transformation can be set directly, or the current transformation can be transformed further with methods like DC.scale, DC.translate, or DC.rotate:
> dc.save_and_restore:
draw_face(dc)
> dc.save_and_restore:
draw_face(dc)
> dc.save_and_restore:
draw_face(dc)
> dc.save_and_restore:
draw_face(dc)
> target
1.4 Drawing Paths
Drawing functions like DC.line and
DC.rectangle are actually convenience functions for the
more general DC.path operation. The
DC.path operation takes a path, which describes
a set of line segments and curves to draw with the pen and—
An instance of Path holds a path. Conceptually, a path has a current pen position that is manipulated by methods like Path.move_to, Path.line_to, and Path.curve_to. The Path.move_to method starts a subpath, and Path.line_to and Path.curve_to extend it. The Path.close method moves the pen from its current position in a straight line to its starting position, completing the subpath and forming a closed path that can be filled with the brush. A Path object can have multiple closed subpaths and one final open path, where the open path is drawn only with the pen.
For example,
creates an open path. Drawing this path with a black pen of width 5 and a transparent brush produces
Drawing a single path with three line segments is not the same as drawing three separate lines. When multiple line segments are drawn at once, the corner from one line to the next is shaped according to the pen’s join style. The image above uses the default #'round join style. With #'miter, line lines are joined with sharp corners:
If the subpath in zee is closed with Path.close, then all of the corners are joined, including the corner at the initial point:
Using blue_brush instead of a transparent brush causes the interior of the path to be filled:
When a subpath is not closed, it is implicitly closed for brush filling, but left open for pen drawing. When both a pen and brush are available (i.e., not transparent), then the brush is used first, so that the pen draws on top of the brush.
1.5 Text
Draw text using the DC.text method, which takes a string to draw and a location for the top-left of the drawn text:
> dc.brush := draw.Brush.none
> text_target
The font used to draw text is determined by the DC’s current font. A font is described by a Font object and installed as the DC.font property. The color of drawn text, which is separate from either the pen or brush, can be set via the DC.text_color property.
~kind: #'roman,
~weight: #'bold)
> dc.text_color := "blue"
> text_target
To compute the size that will be used by drawn text, use DC.text_extent, which returns four values: the total width, total height, difference between the baseline and total height, and extra space (if any) above the text in a line. For example, the result of DC.text_extent can be used to position text within the center of a box:
> def (w, h, d, a) = dc.text_extent("Hello, World!")
> dc.text("Hello, World!", ~dx: (100 - w) / 2, ~dy: (30 - h) / 2)
> text_target
1.6 Alpha Channels and Compositing
When you create or DC.clear a bitmap, the content is nothing. “Nothing” isn’t the same as white; it’s the absence of drawing. For example, if you take text_target from the previous section and copy it onto another DC using DC.bitmap, then the black rectangle and blue text is transferred, and the background is left alone, because the background was never filled and is still “nothing”:
> new_target
The information about which pixels of a bitmap are drawn (as opposed to “nothing”) is the bitmap’s alpha channel. Not all DCs keep an alpha channel, but bitmaps keep an alpha channel by default. Bitmaps loaded with Bitmap.from_file preserve transparency in the image file through the bitmap’s alpha channel.
An alpha channel isn’t all or nothing. When the edges text is anti-aliased by DC.text, for example, the pixels are partially transparent. When the pixels are transferred to another DC, the partially transparent pixel is blended with the target pixel in a process called alpha blending. Furthermore, a DC has an alpha value that is applied to all drawing operations; an alpha value of 1.0 corresponds to solid drawing, an alpha value of 0.0 makes the drawing have no effect, and values in between make the drawing translucent.
For example, setting the DC’s alpha to 0.25 before calling DC.bitmap causes the blue and black of the “Hello, World!” bitmap to be quarter strength as it is blended with the destination image:
> new_target
Setting a DC’s opacity by itself does not always have the intended effect. In particular, if the goal is to fade overlapping shapes, then setting DC.alpha affects individual steps and the way they overlap, instead of affecting the overall drawing:


Use DC.using_alpha to apply alpha compositing to a sequence of drawing commands, rendering them all at once with the given opacity. The DC.using_alpha form wraps DC.start_alpha and DC.end_alpha around its body.
> o_dc.using_alpha (0.3):
draw_overlap(o_dc)
> target

1.7 Clipping
In addition to tempering the opacity of drawing operations, a DC has a clipping region that constrains all drawing to inside the region. In the simplest case, a clipping region corresponds to a closed path, but it can also be the union, intersection, subtraction, or exclusive-or of two paths.
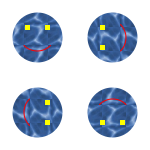
For example, a clipping region could be set to three circles to clip the drawing of a rectangle (with the 0.25 alpha still in effect):
> def p:
> dc.rectangle([[0, 0], [100, 30]])
> new_target
The clipping region can be viewed as a convenient alternative to path filling or drawing with stipples. Conversely, stippled drawing can be viewed as a convenience alternative to clipping repeated calls of DC.bitmap.
Combining regions with Brush objects that have gradients, however, is more than just a convenience, as it allows us to draw shapes in combinations we could not otherwise draw. To illustrate, here is some code that draws text with its reflection below it.
// First compute the size of the text we're going to draw,
// using a small bitmap that we never draw into
def (tw, th):
let (tw, th, ta, td) = b_dc.text_extent(str)
values(math.exact(math.ceiling(tw)),
math.exact(math.ceiling(th)))
// Now we can create a correctly sized bitmap to
// actually draw into and enable smoothing
// Next, build a path that contains the outline of the text
upper_path.text_outline(str, ~font: font)
// Next, build a path that contains the mirror image
// outline of the text
lower_path.transform(draw.Transformation(1, 0, 0, -1, 0, 0))
// This helper accepts a path, sets the clipping region
// of bdc to be the path (but in region form), and then
// draws a big rectangle over the whole bitmap;
// the brush will be set differently before each call to
// draw-path, in order to draw the text and then to draw
// the shadow
fun draw_path(path):
b_dc.save_and_restore:
b_dc.clipping_region := r
// Now we just draw the upper-path with a solid brush
draw_path(upper_path)
// To draw the shadow, we set up a brush that has a
// linear gradient over the portion of the bitmap
// where the shadow goes
def stops:
[[0, draw.Color(0, 0, 0, 0.4)],
[1, draw.Color(0, 0, 0, 0.0)]]
draw.LinearGradient([0, th],
[0, 2*th],
stops))
draw_path(lower_path)
> bm
1.8 Portability and Bitmap Variants
Drawing effects are not completely portable across platforms, across different classes that implement DC, or different kinds of bitmaps. Fonts and text, especially, can vary across platforms and types of DC, but so can the precise set of pixels touched by drawing a line.
Different kinds of bitmaps can produce different results:
Drawing to a bitmap produced by the Bitmap constructor draws in the most consistent way across platforms.
Drawing to a bitmap produced by Bitmap.make_platform uses platform-specific drawing operations as much as possible. Depending on the platform, however, a bitmap produced by Bitmap.make_platform may have no alpha channel, and it may use more constrained resources than one produced by the Bitmap constructor (on Windows due to a system-wide, per-process GDI limit).
As an example of platform-specific difference, text is smoothed by default with sub-pixel anti-aliasing on Mac OS, while text smoothing in the result of the Bitmap constructor uses only grays. Line or curve drawing may touch different pixels than in a bitmap produced by the Bitmap constructor, and bitmap scaling may differ.
A possible approach to dealing with the GDI limit under Windows is to draw into the result of a Bitmap.make_platform call and then copy the contents of the drawing into the result of the Bitmap constructor. This approach preserves the drawing results of Bitmap.make_platform, but it retains constrained resources only during the drawing process.
Drawing to a bitmap produced by make_screen_bitmap from gui uses the same platform-specific drawing operations as drawing into a gui.Canvas instance. A bitmap produced by make_screen_bitmap uses the same platform-specific drawing as Bitmap.make_platform on Windows or Mac OS, but possibly scaled, and it may be scaled or sensitive to the display on Unix.
On Mac OS, when the main screen is in Retina mode (at the time that the bitmap is created), the bitmap is also internally scaled so that one drawing unit uses two pixels. Similarly, on Windows or Unix, when the main display’s text scale is configured at the operating-system level (see get_display_resolution, the bitmap is internally scaled, where common configurations map a drawing unit to 1.25, 1.5, or 2 pixels.
Use make_screen_bitmap when drawing to a bitmap as an offscreen buffer before transferring an image to the screen, or when consistency with screen drawing is needed for some other reason.
A bitmap produced by gui.Canvas.make_bitmap is like a bitmap from make_screen_bitmap, but on Mac OS, the bitmap may be optimized for drawing to the screen (by taking advantage of system APIs that can, in turn, take advantage of graphics hardware).
Use gui.Canvas.make_bitmap for similar purposes as make_screen_bitmap, particularly when the bitmap will be drawn later to a known target canvas.